Lesson Learned – Not all patterns are created equal.
I’m learning and growing. Every project is a new experience. I’m a completely different sewist from the person that made those pillowcases a little over a year ago. At that time I would have never thought I could pull off a wrap dress. Heck, that was when I thought you needed a “special” sewing machine to sew knits. As my grandmother used to say … “Bae, When you know better. You do better.” (Yes, my G-Ma was using Bae before Pharell and Miley.) I know better … when it comes to some things. With others I’m still learning.
One of the things I’m still learning – the foreign language of pattern instructions. Reading pattern instructions and a pattern envelope is like learning a new language. Or better yet … it’s like deciphering code. A secret code …. The Da Vinci Code. (Apologies, I digress) You get what I mean right? Deciphering the pattern envelope and instructions is something you get better with over time. And when I initially attempted McCall’s M6702 I thought I failed for two reasons. (1) Lack of experience. (2) I wasn’t completely grasping the pattern instructions.
Having gained some experience over the last 18 months or so … I thought I would try again. This was an exercise in futility. McCalls 6702 is my nemesis. I hate, hate, hate it with every fiber of my being. It’s terrible. Immediately after I publishing this post, I will burn the pattern … for no other reason other than it will make me feel better.
I’ll start where I failed … the V-neck. My last attempt I couldn’t get the V-neck to work. I even took it to an ASG meeting to get help from more experienced sewists. Their assessment. (1) This wasn’t an “easy” pattern, even though it was marketed as such. (2) The way the instructions were written were a bit confusing, even for them. After several attempts, I gave up.

I was able to get the V-neck completed on this try. Though I admit the following.
The instructions were still a bit confusing.
One thing I’ve noticed the more I sew. I don’t rely on the step-by-step instructions as much as I used to. There are some things you just know to do and they become instinctual over time. For example … placing the right side of fabric together. Trimming the seam allowance. Clipping curves. For this pattern, I relied very heavily on the instructions for the V-neck, I had to go back over and over again to get the neckline correct.
I’ve learned through sewing, that every step is a means to and end. There is a logic behind every step or technique in the instructions. Though I may not understand the why behind the step, I can usually be sure there is good reason for it. At some point I’ll acknowledge … oh that’s why I needed to do that! But for this pattern, there we several instructions where I couldn’t follow the logic. An example, the topstitching, on top of topstitching, on top of topstitching. To me this created room for error, and unnecessary stitching. I was topstitching on top of previous stitching not only on the V-neck, but also the pockets.
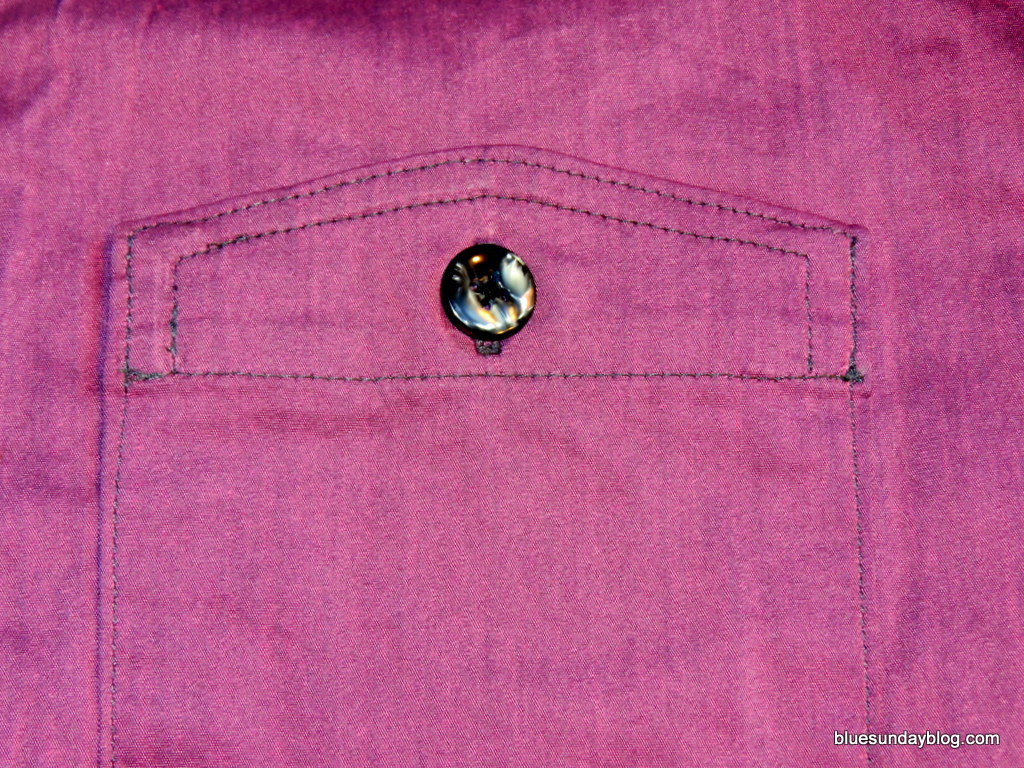
I was excited about this working pockets on the shirt. I’d never made them and they were pretty easy to construct. This was another area where I was asked to topstitch on top of previous stitching. I ultimately decided to omit some of this topstitching because it became bulky and messy.
I did get a lot of experience making button holes. Before this pattern, I’d only made one buttonhole for a skirt. This pattern called for not only working buttons on the pockets, but on the cuffs as well. I was so excited to have these design details, and they weren’t as cumbersome or as difficult as I feared.
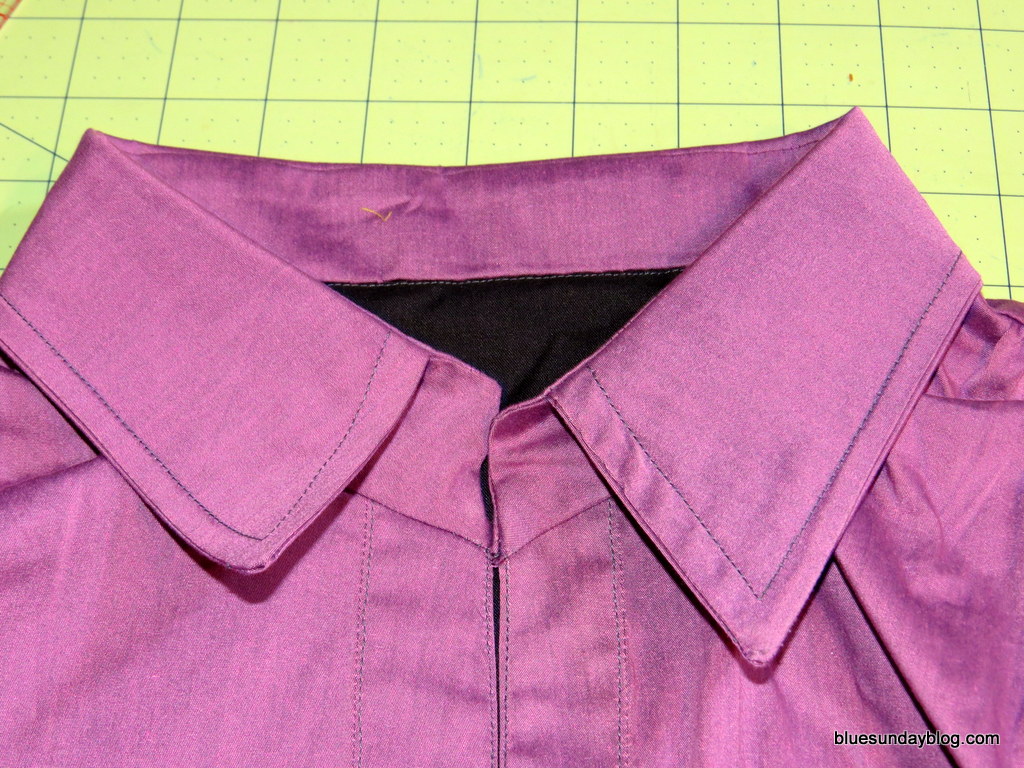
 I’d also never constructed a collar before.
 Getting this far into the pattern I was getting extremely excited at finishing this shirt and having a completed garment for work.
But I got to the sleeves and that’s where I failed again. The pattern called for sleeves consisting 2 pieces. An upper sleeve and a lower sleeve. I cut them out. Sewed them together, and one sleeve wouldn’t fit. It was as if the pieces were backwards. I pulled them apart, sewed them together again. Same result. I went back to the pattern pieces and validated I cut them out correctly. Everything looked right, but it was evident I’d done something wrong.
I had just enough fabric to cut out one more sleeve. So I proceeded to cut out another one. I was so far in to the garment at this point. The last thing I wanted to do was to give up. Same result.
Being completely out of fabric, I had to give up. This pattern, just wasn’t for me. And when you’re out of fabric. Your options are limited!
Tell me, how far do you go before giving up on a pattern? What steps do you take when you’re having problems with construction? I’d love your insight.

Did you match up the notches on the sleeves correctly. Front of the sleeve has one notch, back of the sleeve has two. Also, most Big 4 pattern companies (McCall’s, Vogue, Butterick, Simplicity) use too much ease in the sleeve cap so you must use an ease stitch to slightly gather the sleeve to get it to go into the armhole. Have you carefully marked the right and the wrong side of each piece and made sure you have both right side sleeve pieces and both left side sleeve pieces together and have not mixed them. Lastly, sometimes it is the pattern so burn away.
Theresa in Tucson
Hi Theresa – Thanks so much for the feedback and for stopping by. You know I should have been clearer in my post. The problem wasn’t with the sleeve cap. It was with the upper and lower sleeve. Those two pieces did not seem to work. Cutting incorrectly was my first thought, so I did go back and double check the pattern pieces. And even though they looked okay, I cut them out again with the same result.
And I really appreciate the feedback, this is exactly what I’m looking for. Thanks again!
You gave it your best shot — twice! That is awesome, and a great way to see how far you’ve come. No clue here on how to diagnose those sleeves, though, sorry. 😦
As for pattern fails, well: my high school art teacher busted her butt getting us paper and other supplies. Wastage was not an option. If we thought we’d screwed up our project, she would tell us to ‘make it work’ — and we always managed to. So I’ve never had a pattern fail, though I’ve finished garments that turned out to be hideous! Some of those I’ve kept to reuse the fabric, and some I’ve kept to remind me of what not to do. :p
Hahah! Thanks and very good point! I actually donated the fabric on Saturday, and within a few hours of this post one of my ASG friends invited me over to work on it together! So Lesson Learned. Don’t toss out the half finished projects!
I love a good two-piece sleeve! But not all are drafted well. Were you having trouble with the seams of the upper and lower sleeve fitting together evenly? There is ease at the elbow so that you can more easily bend your arm – this means that the upper sleeve will be longer than the lower until you ease the extra length in to fit.
And just fyi, pattern instructions (especially on Big4 patterns) are almost always worthless. I usually just scan them to make sure I understand the general idea of construction and then do it how I prefer. Someone once told me that “instructions are for people who don’t know what they’re doing.” =)
Hey Brooke. Yes that’s correct. It was the upper and lower seams fitting together. Hmmm – great point about the elbow and ease in that area. If memory serves me correct on how that pattern was shaped, it was angled a bit. It would have been nice to have “ease” written on the pattern.
I’m learning that actually making a pattern is more instinctual than following instructions. Hopefully I can learn more to where I can follow my gut verses killing my fabric by topstitching over previous topstitching 4 times. I don’t know if I’m more mad at having lost the fabric or that the pattern was really marketed as “easy”! Sigh! I’ll live to sew another day!!
Yes, 2-piece sleeves are usually angled at least a little (like the elbow is already bent). A good pattern will have notches on either side of the ease at the elbow – so if you match the notches on both pieces, you can see where you need to ease the fabric. I always pin match all notches first and then you can easily see where there is ease when you pin the rest.
You need to come raid my “library” at some point! I have all kinds of books you would find useful. =)
Yes! Things have been so busy. Maybe we can work in another brunch. And I’d still love to have you consult on that costume for my aunt!!
You know every pattern can’t be saved and it’s not always operator error. This has happened to every sewist under the sun – there are just times when things don’t work out. Think of it like shopping and finding an awesome shirt and taking it to the fitting room. Then trying it on to realize it absolutely won’t work. It’s the same principle but you’ve just spent time actually constructing it. So my question is what did you learn from this exercise and can you use it going forward? Failures make you a better sewist just like successes do!
Hi Carolyn – That is an excellent perspective. Just because I’m buying the pattern, or investing in the pattern doesn’t mean it’s going to give me what I want in the end. That’s great feedback and it helps me in adjusting my expectations when “trying” a pattern. There is no guarantee it will deliver.
Your question on what I learned from it gave me pause. I’m still mulling it over. One big take away was … not be afraid to try new techniques or things I don’t know. The collar, pockets, button holes and buttons were all big things for me. And I was able to tackle them.
Another take away – was not spending 6 weeks trying to figure out this pattern. I’ve done that before and after 2 attempts with the sleeve I was done.
I believe my biggest take away was I am still learning and it’s okay to fail. It’s okay to have something not work out. I just have to always be prepared to move to the next!
Thanks so much for your feedback. It really made me think!